Disabling JupyterLab extensions on your z2jh JupyterHub installations

Sometimes you want to temporarily disable a JupyterLab extension on a JupyterHub by default, without having to rebuild your docker image. This can be very easily done with z2jh’s singleuser.extraFiles, and JupyterLab’s page_config.json

JupyterLab’s page_config.json lets you set page configuration by dropping JSON files under a labconfig directory inside any of the directories listed when you run jupyter --paths. We just use singleuser.extraFiles to provide this file!

singleuser:
  extraFiles:
    lab-config:
      mountPath: /etc/jupyter/labconfig/page_config.json
      data:
        disabledExtensions:
          jupyterlab-link-share: true

This will disable the link-share labextension, both in JupyterLab and RetroLab. You can find the name of the extension, as well as its current status, with jupyter labextension list.

jovyan@jupyter-yuvipanda:~$ jupyter labextension list
JupyterLab v3.2.4
/opt/conda/share/jupyter/labextensions
        jupyterlab-plotly v5.4.0 enabled OK
        jupyter-matplotlib v0.9.0 enabled OK
        jupyterlab-link-share v0.2.4 disabled OK (python, jupyterlab-link-share)
        @jupyter-widgets/jupyterlab-manager v3.0.1 enabled OK (python, jupyterlab_widgets)
        @jupyter-server/resource-usage v0.6.0 enabled OK (python, jupyter-resource-usage)
        @retrolab/lab-extension v0.3.13 enabled OK

This is extremely helpful if the same image is being shared across hubs, and you want some of the hubs to have some of the extensions.

singleuser.extraFiles can be used like this for any jupyter config, or generally any config file anywhere. For example, here’s some config that culls idle running kernels, and shuts down notebooks after 60m of inactivity:

singleuser:
  extraFiles:
    culling-config:
      mountPath: /etc/jupyter/jupyter_notebook_config.json
      data:
        NotebookApp:
          # shutdown the server after no 30 mins of no activity
          shutdown_no_activity_timeout: 1800

        # if a user leaves a notebook with a running kernel,
        # the effective idle timeout will typically be CULL_TIMEOUT + CULL_KERNEL_TIMEOUT
        # as culling the kernel will register activity,
        # resetting the no_activity timer for the server as a whole
        MappingKernelManager:
          # shutdown kernels after 30 mins of no activity
          cull_idle_timeout: 1800
          # check for idle kernels this often
          cull_interval: 60
          # a kernel with open connections but no activity still counts as idle
          # this is what allows us to shutdown servers
          # when people leave a notebook open and wander off
          cull_connected: true

Personal stance on 'crypto' and 'web3'

This post is inspired by a slack conversation with Ryan Abernathey and Sarah Gibson.

It is very important to me that we don’t exist in a world where the Internet is just centralized and controlled by a few huge, hypercapitalist players. I’ve written about ways the open source community can help here (by not tying ourselves to a single provider), and helped draft the right to replicate policy to put it into effect at 2i2c. This topic is important to me - I don’t want a future where step 1 of learning to code is something extremely vendor specific.

Theoretically, this is very well within the scope of the ‘web3’ movement (quite different from the web 3.0 movement which has mostly died out). I would love for that to be the case, but unfortunately I’ve found almost nothing about the ‘crypto’ or ‘web3’ communities attractive. I’m going to try write down why in this post.

Most of this isn’t unique thought - others have written about these with much more citations, and deeper analysis than I have. I encourate you to seek those out and read them. This is also not an exhaustive list, but a bare minimum.

Environmental impact of proof of work

Difficult for me to get past the environmental impact of most proof of work systems. Any renewable energy they use is energy that could be used to take more fossil fuels off the grid. I don’t want proof of work systems to switch to renewable energy - I want them to stop existing.

The rich get richer

In the economic models of almost all ‘crypto’, growing inequality is a feature, not a bug. This is outright formalized in Proof of Stake systems, and is de-facto true in most Proof of Work systems. I don’t really want to live in a world that is even more unequal than the one I live in now. Fixes to this would be fundamental to any possible positive outcome from the ‘crypto’ community.

“Distributed Ledger” is not a solution to many problems

The buzzwordiness of ‘blockchain’, ‘crypto’ and ‘web3’ mean they’re now being forcefit into problems they are very poor solutions for. Every time I see the word ‘blockchain’, I mentally replace it with ‘distributed ledger’, and see if it can still be a good fit for the given problem. Most often, it does not. Problems often have to be reframed in terms of ’transactions’ to have a blockchain solve them, and I think this reframing is often fundamentally problematic - life isn’t transactional. When all you have is a distributed ledger, everything looks like a problem of incentives.

So any time something purports to solve a problem that is not use as a currency using a blockchain, consider carefully the problem it is solving, and seeing if the solutions it is proposing actually solve the problem in a way that is generally usable given latency and throughput consideration.

Let’s evaluate the tech on a case-by-case basis

The fediverse is quite cool. I think of IPFS as the spiritual successor to bittorrent in many ways (yes, I know they consider themselves to be web3). There’s a lot of really cool conceptual work happening in removing ourselves from being beholden to a couple of major corporations that doesn’t necessarily require buying into a speculative, environmentally disastrous property bubble. I want to evaluate each tech that might be solving a problem I find important, but if it has brought in strongly to the ‘crypto’ or ‘web3’ hype, it just has a much bigger bar to clear to prove that it just isn’t a speculative ponzi scheme.

I can’t wait for the huge amounts of money, wasteful proof of work and the hype train to die out, so we can pick up the useful tech that comes out of this.

The fastest way to share your notebooks - announcing NotebookSharing.space

NotebookSharing.space logo

Sharing notebooks is harder than it should be.

You are working on a notebook (in Jupyter, RStudio, Visual Studio Code, whatever), and want to share it quickly with someone. Maybe you want some feedback, or you’re demonstrating a technique, or there is a cool result you want to quickly show someone. A million reasons to want to quickly share a notebook, but unfortunately there isn’t a quick enough and easy enough solution right now. That’s why I built notebooksharing.space, focused specifically on solving the problem of - “I have a notebook, I want to quickly share it with someone else”.

Ryan Abernathey captures the current frustration, and lays out a possible glorious future for what a ‘share a notebook I am working on’ workflow might look like. NotebookSharing.space is a start in tackling part of this. I highly recommend reading this thread.

Just upload, no signup necessary

As the goal is to have the fastest way to upload your notebook and share it with someone, there is no signup or user accounts necessary. Just upload your notebook, get the link, and share it however you want. Notebook links are permalinks - once uploaded, a notebook can not be changed. You can only upload a new notebook and get a new link.

The upload is a bit slow in the video demos here because I’m sitting on a hammock in a remote beach, but should be much faster for you.

You can upload your notebook easily via the web interface at notebooksharing.space:

Once uploaded, the web interface will just redirect you to the beautifully rendered notebook, and you can copy the link to the page and share it!

Or you can directly use the nbss-upload commandline tool:

On Macs, you can pipe the output of nbss-upload to pbcopy to automatically put the link in your clipboard. Here is the example notebook that I uploaded, so you can check out how it looks.

A jupyterlab extension to streamline this process is currently being worked on, and I’d appreciate any help. I’d also love to have extensions for classic Jupyter Notebook, RStudio (via an addin), Visual Studio Code, and other platforms.

Provide feedback with collaborative annotations

When uploading, you can opt-in to have collaborative annotations enabled on your notebook via the open source, web standards based hypothes.is service. You can thus directly annotate the notebook, instead of having to email back and forth about ’that cell where you are importing matplotlib’ or ’that graph with the blue border’. This is one of the coolest features of notebooksharing.space.

You can annotate the notebook demoed in the video here. Note that you need a free hypothes.is account to annotate, but not to read.

Annotations are opt-in to limit unintended abuse. Enabling an unrestricted comments section on every notebook you upload is probably a terrible idea.

Private by default

By default, search engines do not index your notebooks - you have to opt-in to making them discoverable while you are uploading the notebook. This way, only those you share the link to the notebook with can view it. But be careful about putting notebooks with secret keys or sensitive data up here, as anyone with a link can still view it - just won’t be able to discover it with search engines.

RMarkdown and other formats are supported

It has always been important to me that the R community is treated as a first class citizen in all the tools I build. Naturally, NotebookSharing.space supports class support for R Notebooks as well as R Markdown files experimentally. R Notebooks produced by RStudio are HTML files, and will be rendered appropriately, including outputs (see example). RMarkdown (.rmd) files only contain code and markdown, and will be rendered appropriately (see example) ). If you enable annotations, they will work here too! I would love for more feedback from the R community on how to make this work better for you. In particular, an RStudio Addin that lets you share with a single shortcut key from RStudio would be an amazing project to build.

If you work primarily in the R community, I’d love to work with you to improve support here. I know there are bugs and rough edges, and would love for them to get better.

Internally, the wonderful jupytext project is used to read various notebook formats, so anything it supports is supported on NotebookSharing.space. This means .py files and .md files produced by Jupytext or Visual Studio code will also be rendered correctly, albeit without outputs as those are not stored in these files.

Next steps?

I want extensions that let you publish straight from wherever you are working - JupyterLab, classic Jupyter Notebook, RStudio and VS Code. That should speed up how fast you can share considerably. Any help here is most welcome!

I also want users to interactively run the notebooks they find here easily. This involves some integration with mybinder.org most likely, where you (or the notebook author) can specify which environment to launch the notebook into. Wouldn’t it be wonderful to have a ‘Make interactive’ button or similar that can immediately put the notebook back into an interactive mode?

Tweets from here on in Ryan’s twitter thread sell this vision well.

Feedback

I love feedback! That’s why I spend my time building these. Open an issue or tweet at me. As with all my projects, this is community built and run - so please come join me :)

Inspiration

Growing up on IRC, pastebin services are part of life. In 2018, GitHub stopped supporting anonymous gists

  • so sharing a notebook with someone became a lot more work. NotebookSharing.space hopefully plugs that gap. The excellent rpubs.com is also an inspiration!

Announcing the nbgitpuller Link Generator browser extensions

(Leave comments or discuss this post on the jupyter discourse)

nbgitpuller is my most favorite way to distribute content (notebooks, data files, etc) to students on a JupyterHub. The student mental model is ‘I click a link, and can start working on my notebook’, which is as close to ideal as we have today. That is possible since all the information required for this workflow is embedded in the link itself - so it can be distributed easily via your pre-existing communication channel (like email, course website, etc), rather than requiring your students to use yet another tool.

However, creating these links often been a bit clunky and error prone. The current link generator is pretty awesome, but requires a lot of manual copy pasting, and is prone to errors. Particularly problematic was the GitHub switching of the default branch from master to main, which really caused problems for many instructors.

To make life easier, I’ve now written a browser extension that lets you create these links straight from the GitHub interface!

On the GitHub page for files, folders and repositories, it adds an ’nbgitpuller’ button.

nbgitpuller button

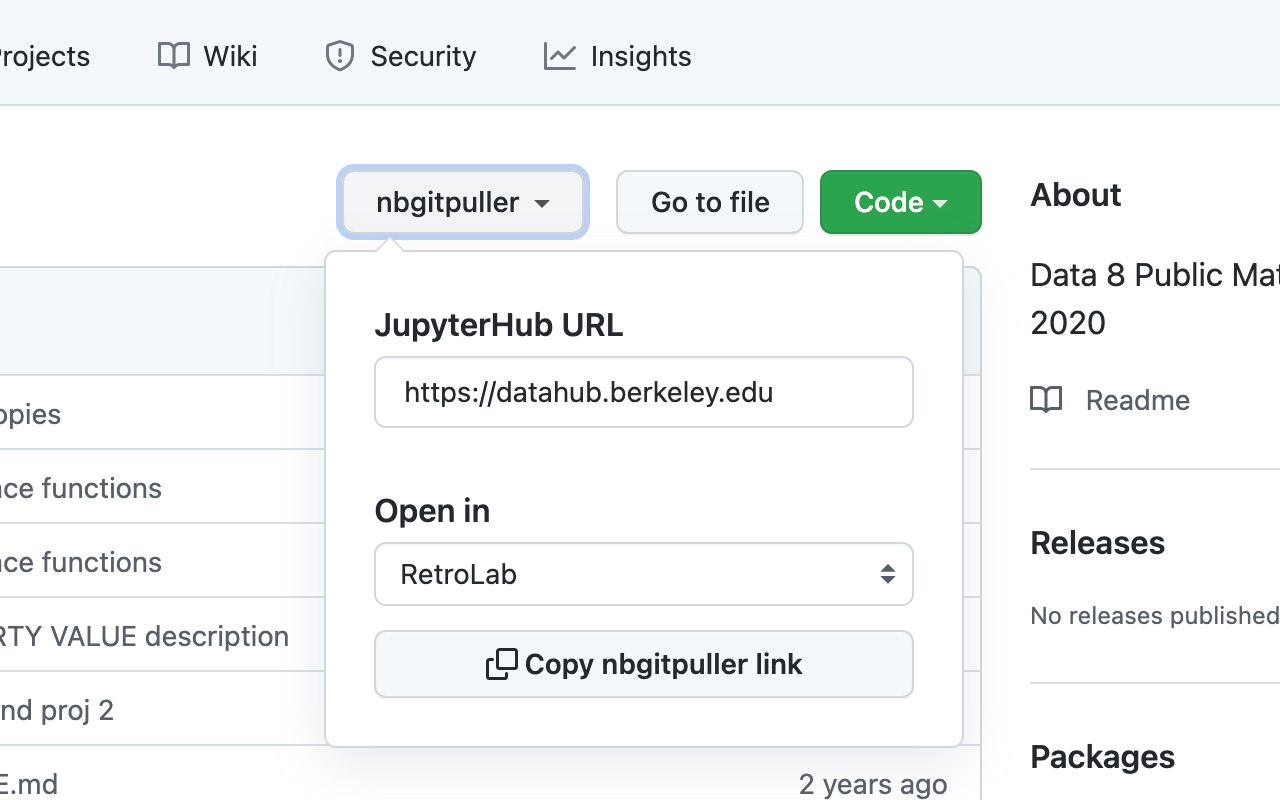
On clicking this, you can enter a JupyterHub URL and the application you want to use to open this file, folder or repository. Then you can just copy the nbgitpuller URL, and share it with your students!

nbgitpuller popover

The JupyterHub URL and application you choose are remembered, so you do not need to enter it over and over again.

How to install?

On Mozilla Firefox

I ❤️ Mozilla Firefox, and you can install the extension there easily from the official addons store. You’ll also get automatic updates with new features and bug fixes this way.

On Google Chrome

On Google Chrome / Chromium, I have submitted the extension to the Chrome Web Store - but apparently there is a manual review process, and it can take weeks. In the meantime, you can install it with the following steps

  1. Download the .zip version of the latest release of the extension. You want the file named nbgitpuller_link_generator-<version>.zip.
  2. Extract the .zip file you downloaded.
  3. In your Google Chrome / Chromium, go to chrome://extensions.
  4. Enable the Developer Mode toggle in the top right. This should make a few options visible in a new toolbar.
  5. Select Load Unpacked, and select the directory into which the downloaded .zip file was extracted to. This directory should contain at least a manifest.json file that was part of the .zip file.

Other browsers

The extension is written as a WebExtension, so should work easily in other browsers - Safari, Edge, etc. However, since I do not use them myself, I don’t have instructions on how to add them there. However, if you do use those browsers, I’d love contributions on how to install the extension there!

Contribute!

The extension was a overnight hack, and it made me very happy to get it shipped. There is a lot of room for improvement - I would love for you to provide feedback and contribute in any way possible on GitHub

Learning R

I’m paying money to learn datascience with R via this John Hopkins course on Coursera. Hopefully I can spend about 4h a week on it.

Why?

I try to have a ‘T’ shaped set of competencies - some competence in a lot of areas, and deeper knowledge in some. Having some competence in many areas lets you notice where a particular skill can be very helpful in solving a problem, and either apply it yourself or bring in someone who can. Interesting problems are found in intersections, and learning this will give me access to more intersections :)

It is also an extremely useful skillset - I am sure I can apply it to more problems than I can apply (for example) cloud computing knowledge.

I’ve been building tools for data scientists for a while now, but since I don’t actually know much about data science itself my effectiveness is limited.

Why this course?

I went to coursera.org, typed ‘data science’ and this was the first that showed up :D

Why R?

I already know Python as a programming language, which sometimes makes it difficult for me to learn data science via it. Many courses targetted at people with my level of skill in data science / stats also teach some python alongside, and I often found that distracting.

With my JupyterHub contributor hat on, I think it’s extremely important that R is a first class citizen in all the teaching & research tools I build. Getting some experience using it will help in this goal.

Why this blog post?

Just as a form of external accountability.

The many ways to access your JupyterHub environment

JupyterHub was designed to provide multi-user access to Classic Jupyter notebook and JupyterLab, running on machines far away with access to data & compute your local machines don’t have. However, there are a lot of users this leaves out - R users on RStudio, folks who prefer ssh based interfaces, people on local IDEs like vscode or pycharm, etc. We trust that these users know better than ‘us’ developers & admins what user interface works best for them, and make sure that our JupyterHub setups work for them.

I propose that we try provide the following in all JupyterHub setups, but particularly on cloud-based deployments focused on research.

  1. Arbitrary web applications on the browser, not just classic notebook & JupyterLab. This could be RStudio / Shiny for R folks, Pluto.jl for Julia folks, Theia IDE or vscode for arbitrary languages, etc. These need to be first class citizens with amazing support. jupyter-server-proxy does a lot of this already - but still needs to be ‘set up’ in your deployment. DO IT!

  2. ssh support, so you can ssh yuvipanda@myhub.org, and have it work as you would expect. It should have the same environment & home directories as your browser based sessions. Along with something like kbatch, this could let folks who like their current HPC style workflows keep it. SFTP for file transfer, SSH Tunneling, scripting via command execution, etc should also come along with this, allowing re-use with a vast array of existing tools & workflows.

  3. Connecting from local IDEs, for notebook execution. The Jupyter protocol is designed to work with a variety of frontends, and many IDEs support connecting directly to a Jupyter kernel - Visual Studio Code, PyCharm, spyder, emacs, etc. There is already decent-ish support for this, but would be nice to explicitly document, bugfix and promote this to users.

  4. Connecting from local IDEs for a full remote development environment. Connecting to a remote Jupyter kernel often doesn’t give you all that you want from your IDE - no access to remote filesystem, limited access from other IDE features (version control, global find, etc). Many IDEs offer a ‘remote development’ experience that gives you all this, and usually requiring just a few SSH features to work. VSCode’s remote development feature is very well done, popular and not open source, but we should support it. PyCharm supports this, and Emacs’ TRAMP is highly rated as well.

You might not need some of these in your deployment - for example, you might have no R users, rendering RStudio not very useful. However, I think the world is getting more and more polyglot, and we need to move with it. Consider deploying these, even if your users don’t explicitly ask for it - I suspect many will use it once it is there. <3

Work to be done

There’s a lot of work to be done here to make this all a great experience.

  1. Documentation and publicity for jupyter-server-proxy. For example, this README is all the docs that exist on how to set up RStudio to work in your JupyterHub. This is low hanging fruit with huge impact. Same for running remote desktop applications, Pluto.jl, and many many others.
  2. Work on jupyterhub-ssh. Aims to provide full SSH support - terminal emulation, command execution, tunneling and SFTP. This would go a long way in supporting (2) and (4) above. It sortof-kinda works now, but effort poured into it will be well spent. I long for a day when setting this up would be as simple as setting up z2jh or TLJH, and it actually isn’t that far away if effort is put into it.
  3. More outreach to non-Jupyter communities about levaraging JupyterHub for their workflows. The name ‘Jupyter’ in ‘JupyterHub’ is no longer fully accurate, given all the other things that can be run with it. We should reach out to other communities and ‘bring them into the fold’, so to speak - so their workflows, desires and bugs can drive development.
  4. A unified setup guide for ‘research hubs’, that guides first-time admins through setting these up - including great documentation. A z2jh for research hubs on the cloud would be extremely well received I believe.

Will you help?

I’ve been talking to Chris Holdgraf a lot on how to go about getting folks into doing stuff like this. I see two primary options:

  1. Get funding from various entities (foundations, universities, corporations, etc) for folks to do this. Hopefully 2i2c can be a vehicle for this.
  2. Pour a lot more effort into getting more new developers into JupyterHub development than we are now. This would mean things like participating in Google Summer of Code, Outreachy, development sprints in various conferences, etc.

Would love to hear thoughts from you, dear reader :) Email yuvipanda@gmail.com.

kbatch: sbatch, but for kubernetes

Submitting ’non-interactive’ jobs that can run independent of a user’s current session on a JupyterHub is a pressing problem. There are many many solutions to this, but I think there’s a lot of value in having an extremely simple solution that solves exactly one extremely well defined problem.

We will only consider JupyterHubs running on top of Kubernetes, since that has all the actual capabilities we need to solve this problem. We only need to have a UX wrapper around it.

Problem to solve

If my JupyterHub session is terminated, all the code running there dies - including any dask sessions I might have - even though they are handled externally by dask-gateway.

This is trivially accomplished in batch scheduling systems like slurm, but JupyterHub doesn’t have a simple paradigm for it. It would be very, very useful for it to have one.

Stealing from slurm

Slurm has the sbatch command for submitting jobs, and the squeue command for viewing job information. They have a large number of options that can do extremely complicated things - but I think we can copy a tiny subset of their functionality to solve our specific problem. We will not be copying all its behaviors, nor try to be compatible with it - just be inspired.

kbatch

kbatch would be an equivalent to sbatch - just submitting jobs. You can specify the resources your job would need (CPUs, memory, GPUs, etc), give it a script to execute, and it’ll just submit it and return. Nothing more! At least to begin with, it wouldn’t have a lot of the complex features sbatch has - no array tasks, no multi-step jobs, etc. It would just be a script (or a notebook) that can run independent of the current notebook session. If you want parallelism, you should use dask from this script.

Other names for this could be something like ksubmit or kbackground or similar - the core thing it does is to submit jobs.

Options this command would have:

  1. Script (or notebook to run)
  2. Resources it needs (CPU, memory, GPU, etc)
  3. Where to send stdout / stderr (by default, mimic sbatch behavior and put it on your homedir)
  4. Job name / comment for you to keep track of it

Users shouldn’t have to specify environment or home directories - these should be automatically detected to match current JupyterHub notebook environment. We could probably allow KBATCH commands in the script, similar to SBATCH commands - but more conversation with people who actually use this is needed :)

kqueue

kqueue would let you check in on the status of your jobs - wether they were running, stopped, failed, etc.

That’s it. I think just with these two, we can provide users the ability to run background jobs, from the commandline, similar to how they do so with slurm. We can eventually write GUIs for this fairly easily, since the functionality provided by them is quite simple.

Extra features?

We can easily add more features - tailing logs, getting a shell into your running job to poke around, array jobs, etc. But it would be very nice if we can keep it a simple tool that can be marked complete once it solves the very specific problem it set out to solve.

Implementation

Kubernetes Jobs provide literally everything we need. We will write a simple python application that uses the kubernetes API to do everything. All meta-information will be stored as labels in the Kubernetes Job object, and the python application will be responsible for providing the appropriate UX to our users.

Caveats

This is extremely simple, and isn’t meant for more complex DAG use cases. For those, look at something like Airflow or Prefect or any of the million other things that exist. This is a small UX improvement over kubectl, basically.

Now, let’s go do it!

Setting up a "Production Ready" TLJH

The Littlest JupyterHub is an extremely capable hub distribution that I’d recommend for situations where you expect, on average, under 100 active users.

Why not Kubernetes?

The primary reason to use Zero to JupyterHub on k8s over TLJH in cases with smaller number of users would be to reduce costs - Kubernetes can spin down nodes when not in use. However, you’ll always have at least one node running - for the hub / proxy pods. The extra complexity that comes with it is not worth it - particulary around needing to build your own docker images - is not worth it. TLJH works perfectly well for these cases!

What is ‘production’?

A JupyterHub that you can run itself securely without lots of intervention from the person who created it is what I’ll call a production-ready JupyterHub. It’s a pretty arbitrary standard. In this blog post, I’ll lay out what I want in the TLJH hubs I run before I let users on them.

Authentication

Uses a real Authenticator, not the default FirstUseAuthenticator. The default authenticator is pretty insecure, and should really not be used. If you don’t know what to use, I’ll suggest the Google or GitHub authenticators.

HTTPS

Enable HTTPS. An absolute requirement, TLJH makes it quite easy. You do need to get a domain for this to work, which can be a source of friction. Totally worth it, and many authenticators require this too.

Resource Limits

In many systems, a single user can often write code that accidentally crashes the whole system. By default, TLJH protects against this by enforcing memory limits. I think the default is a 1G limit, but you should tune it to fit your own users. TLJH has more documentation on how to estimate your VM size based on your expected usage patterns.

Sizing your VM correctly

If you choose a VM that’s too big, you’ll end up spending a lot of cash for unused resources. If it’s too small, your users will not have the resources they need to do their work. TLJH provides some helpful docs estimating your VM size, and you can always resize your VM afterwards if you get it wrong.

Disk backups

TLJH contains everything on the VM’s disk - your user environment, users’ home directories, current hub configuration, etc. It is very important you back this up, to recover in case of disasters. Automated disk snapshots from your cloud provider are an easy way to do this. Most major cloud providers offer a way to do this - Google Cloud, Digital Ocean, AWS, etc. Some let you automate it as well - Google & AWS certainly do, I’m not sure about other clodu providers. This isn’t the best way to do backup - there’s approximately 1 billion ways to do so. However, this is an absolute minimum, and it might just be enough.

If you want to be more fancy, I’d suggest using a separate disk / volume for your user home directories, possibly on ZFS, and snapshot much more aggressively. Talk to your nearest google search bar for your options.

Pin your public IP

Some cloud providers often your VM’s public IP address if you start / stop them. This can be pretty bad - you’ll have to change your domain’s DNS entry, and re-aquire HTTPS. A hassle! You can tell your cloud provider to hang on to your IP even if your VM goes down / changes. And you should! DigitalOcean doesn’t require this, but google does. I think AWS does too, but I’m not sure how you can reserve the public IP for it - since it’s usually a domain name itself.

Base environment setup + snapshot

TLJH has a shared conda environment that is used by all users. Everyone can read from it, but only users who are admin can write to it (via sudo). This is one of TLJH’s core design tradeoffs - admins can install packages the way they are used to, without requiring a separate image-build step. But it also means the admin can mess it up - conda environments can be sometimes fickle! So it’s not a bad idea to spend some time in the beginning setting everything up - python packages, JupyterLab extensions, etc. Then make a disk snapshot, so you can revert to it if things go bad (this is where having a separate disk for your user home directories comes in handy).

SSH admin access

The TLJH documentation strives hard to make sure SSH isn’t required for setup and most common usage. However, if your TLJH breaks in certain ways, you can no longer access the machine - since all access is via TLJH! For this, I recommend making sure someone who is admin has SSH access to the VM. Most cloud providers offer a way to set the root ssh key on creation. If not, you can follow the many guides on the internet to making it happen.

You can also just put your ssh keys in $HOME/.ssh/authorized_keys, and ssh in as jupyter-<username>@<hub-ip>. This works for any / all users!

Others?

I’m sure this isn’t the end - probably need something about firewalls, monitoring and automated system package upgrades. But hey, great start!

Access dask-kubernetes clusters running on a cloud from your local machine

You can run your Jupyter Notebook locally, and connect easily to a remote dask-kubernetes cluster on a cloud-based Kubernetes Cluster with the help of kubefwd. This notebook will show you an example of how to do so. While this example is a Jupyter Notebook, the code will work any local python medium - REPL, IDE (vscode), or just plain ol’ .py files

Latest executable version of this notebook can be found in this repository

Credit

This work was sponsored by Quansight ❤️

Create & setup a Kubernetes cluster

You need to have a working kubernetes cluster that is configured correctly. If you can get kubectl get ns to work properly, it means your cluster is working fine & connected for this to go.

Install & run kubefwd

kubefwd lets you access services in your cloud Kubernetes cluster as if they were localy, with a clever combination of ol’ school /etc/hosts hacks & fancy kubernetes port-forwarding. It requires root on Mac OS & Linux, and should theoretically work on Windows too (haven’t tested).

Once you have installed it, run it in a separate terminal.

sudo kubefwd svc -n default -n kube-system

If you’ve created your own namespace for your cluster, use that instead of default. The kube-system is required until this issue is fixed.

If the kubefwd command runs successfully, we’re good to go!

Install libraries we’ll need

In addition to dask-kubernetes, we’ll also need numpy to test our cluster with dask arrays.

%pip install numpy dask distributed dask-kubernetes

Setup dask-kubernetes configuration

Normally, the pod template would come from an external configuration file. We keep this in the notebook to make it more self contained.

POD_SPEC = {
    'kind': 'Pod',
    'metadata': {},
    'spec': {
        'restartPolicy': 'Never',
        'containers': [
            {
                'image': 'daskdev/dask:latest',
                'args': [
                    'dask-worker',
                    '--death-timeout', '60'
                ],
                'name': 'dask',
            }
        ]
    }
}

Create a remote cluster & connect to it

We create a KubeCluster object, with deploymode='remote'. This creates the scheduler as a pod on the cluster, so worker <-> scheduler communication is easy & efficient. kubefwd helps us communicate to this remote scheduler, so we can pretend we are actually on the remote cluster.

If you are using kubectl to watch the objects created in your namespace, you’ll see a service and a pod created for this. kubefwd should also list a log line about forwarding the service port locally.

from dask_kubernetes import KubeCluster

cluster = KubeCluster.from_dict(POD_SPEC, deploy_mode='remote')

Create some workers

We have a scheduler in the cloud, now time to create some workers in the cloud! We create 2, and can watch the worker pods come up with glee in kubectl

All scaling methods (adaptive scaling, using the widget, etc) should work here.

cluster.scale(2)

Run some computation!

We test our cluster by doing some trivial calculations with dask arrays. You can use any dask code as you normally would here, and it would run on the cloud Kubernetes cluster. This is especially helpful if you have large amounts of data in the cloud, since the workers would be really close to where the data is.

You might get warnings about version mismatches. This is ok for the demo, in production you’d probably build your own docker image that will have fixed versions.

from dask.distributed import Client
import dask.array as da

# Connect Dask to the cluster
client = Client(cluster)

# Create a large array and calculate the mean
array = da.ones((1000, 1000, 1000))
print(array.mean().compute())  # Should print 1.0

Cleanup dask cluster

When you’re done with your cluster, remember to clean it up to release the resources!

This doesn’t affect your kubernetes cluster itself - you’ll need to clean that up manually

cluster.close()

Next steps?

Lots more we can do from here.

Ephemeral Kubernetes Clusters

We can wrap kubernetes cluster creation in some nice python functions, letting users create kubernetes clusters just-in-time for running a dask-kubernetes cluster, and tearing it down when they’re done. Users can thus ‘bring their own compute’ - since the clusters will be in their cloud accounts - without having the complication of understanding how the cloud works. This is where this would be different from the wonderful dask-gateway project I think.

Remove kubefwd

kubefwd isn’t strictly necessary, and should ideally be replaced by a kubectl port-forward call that doesn’t require root. This should be possible with some changes to the dask-kubernetes code, so the client can connect to the scheduler via a different address (say, localhost:8974, since that’s what kubectl port-forward gives us) vs the workers (which need something like dask-cluster-scheduler-c12.namespace:8786, since that is in-cluster address).

Longer term, it would be great if we can get rid of spawning other processes altogether, if/when the python kubernetes client gains the ability to port-forward.

Integration with TLJH

I love The Littlest JupyterHub (TLJH). A common use case is that a group of users need a JupyterHub, mostly doing work that’s well seved by TLJH. However, sometimes they need to scale up to a big dask cluster to do some work, but not for long. In these cases, I believe a combination of TLJH + Ephemeral Kubernetes Clusters is far simpler & easier to manage than running a full Kubernetes based JupyterHub. In addition, we can share the conda environment from TLJH with the dask workers, removing the need for users to think about docker images or environment mismatches completely. This is a massive win, and merits further exploration.

???

I am not actually an end user of dask, so I’m sure actual dask users will have much more ideas. Or they won’t, and this will just end up being a clever hack that gives me some joy :D Who knows!

Check if an organization is using GSuite

I needed to find out if an organization was using GSuite for their emails, so I can allow their users to login to a JupyterHub I was setting up. I use Google Auth in other places, so I wanted to find out if this organization was using GSuite.

I could’ve just asked them, but where’s the fun in that? Instead, you can use dig to find out!

For example, if I were to test berkeley.edu, I can run:

$ dig -t mx berkeley.edu

This gives me a bunch of output, the important bits of which are:

;; ANSWER SECTION:
berkeley.edu.		242	IN	MX	5 alt1.aspmx.l.google.com.
berkeley.edu.		242	IN	MX	10 alt3.aspmx.l.google.com.
berkeley.edu.		242	IN	MX	10 alt4.aspmx.l.google.com.
berkeley.edu.		242	IN	MX	1 aspmx.l.google.com.
berkeley.edu.		242	IN	MX	5 alt2.aspmx.l.google.com.

This means that mail to anyone@berkeley.edu is routed via Google, so I know this organization is using GSuite for their users!